#vue js input binding
Explore tagged Tumblr posts
Visit Tumblr Blog
Explore Tumblr blogs with no restrictions, modern design and the best experience.
Last Seen Tumblr Blogs


Fun Fact
Tumblr was the first site to host the blog for President Barack Obama in 2011.
Text
Security and Performance: Key Considerations for Frontend Development Services in 2024

In 2024, companies looking to build or improve their websites and apps need to prioritize security and performance. Choosing an experienced front end development agency is crucial to get this right. By leveraging modern frameworks and following best practices, developers can create fast, responsive experiences that protect user data. As threats and technologies evolve, continuously evaluating and upgrading frontend code is essential. Partnering with experts who stay on top of industry trends allows companies to keep their digital experiences safe while delighting customers.
Security Considerations
Security should be a top priority for any front-end development services today. Implementing SSL/HTTPS across all sites and pages is now a must to encrypt connections and data. Validating and sanitizing user inputs is also critical to prevent scripts or unauthorized commands being injected into applications.
Another key area is implementing protections against common attacks like cross-site request forgery (CSRF) and cross-site scripting (XSS). These can allow attackers to steal user data or authentication details. Following security best practices like the OWASP guidelines can help mitigate these risks.
Strong authentication mechanisms and authorization controls are also vital for securing the front-end against unauthorized access. Practices like multi-factor authentication, role-based access, and use of secure tokens can make user accounts highly secure.
In addition, front-end developers must ensure proper segregation between application layers, use parameterized queries, and implement robust logging and monitoring to detect potential threats and attempted attacks against the front-end.
Performance Considerations
There are many techniques front-end developers can use to optimize performance. Minification removes extra spaces and shortens variable names to make code lighter. Concatenation combines multiple files into one to reduce HTTP requests.
Lazy loading defers non-critical components and images from loading until needed. This speeds initial page load by reducing what needs to be fetched first. Implementing caching strategies also avoids re-downloading assets on repeat views.
Critical CSS/JS extracts only the CSS/JS needed for above-the-fold content. This renders the visible page faster. Compression using gzip shrinks file sizes for faster transfers.
Performance testing tools help identify bottlenecks. Common optimizations include using CDNs, optimizing images, eliminating render blocking resources, and removing unused code.
Progressive enhancement and graceful degradation also improve performance. They ensure core content loads quickly while modern features enhance the experience on capable browsers.
Continued performance testing and optimization is key for ensuring fast, smooth front-end experiences over time.
Frontend Frameworks and Security
Modern frontend frameworks like React, Vue, and Angular all have robust security features built-in or available as plugins. While their core libraries are secure, how developers use them also impacts security.
React offers protection against common attacks like XSS and cross-site script inclusion with features like JSX encoding. Additional security addons are also available.
Vue provides cross-site scripting protection by encoding bindings and interpolations. Authentication plugins help securely manage user access.
Angular has strong CSRF defenses built-in. It also sanitizes inputs to prevent XSS. Authorization controls secure access to routes and resources.
Ember.js automatically escapes Handlebar templates to prevent XSS. It also has security addons like ember-simple-auth for authentication.
Overall, popular frameworks provide good security foundations. But developers must use them properly, add security layers, and keep them updated to leverage their benefits.
Emerging Security Trends
Security is an ongoing challenge in frontend development. As new vulnerabilities emerge, practices and tools must evolve to address them.
Some key trends gaining traction are shifting security left, DevSecOps, and automated testing. Building in security from initial design phases reduces costs and results in more secure systems. DevSecOps integrates security into development workflows for speed and quality. Automated tools help efficiently scan for and fix vulnerabilities early.
Shift left security involves developers, architects and security experts collaborating from the beginning of projects. This results in more secure foundations.
DevSecOps aims to bring security, development and operations together with shared tools, practices and culture. This enables speed without sacrificing security.
Automated scanning and testing tools at each phase quickly catch vulnerabilities without relying solely on human review.
Lightweight protection layers like web application firewalls help defend against threats without slowing performance.
AI and machine learning are being utilized for adaptive cybersecurity defense and attack prevention.
Emerging Performance Trends
Optimizing performance will remain crucial for front-end developers as user expectations grow. New metrics, protocols and patterns are emerging to help build faster experiences.
Some key trends include a focus on user-centric performance metrics like Largest Contentful Paint and Cumulative Layout Shift. HTTP/3 and QUIC aim to speed up transfer times. PRPL and service workers cache or preload resources for snappier loading.
Core web vitals like LCP, CLS and TTI provide user-centric performance metrics beyond speed alone.
HTTP/3 with QUIC protocol features multiplexing and congestion control for faster page loads.
The PRPL pattern aims to Push critical resources, Render initial views, Pre-cache remaining assets, and Lazy-load other routes.
Service workers allow caching site assets like JavaScript, CSS, images, and HTML for instant loading on return visits.
New frameworks like Svelte aim to build high performance into components with a low-overhead design.
More bundlers and build tools now focus on optimizing assets and splitting code for lazy loading parts.
Conclusion
As frontend development continues to evolve, keeping pace with security and performance best practices will be key for agencies to deliver excellent services. By making security a priority throughout the development lifecycle, utilizing emerging DevSecOps practices, and leveraging automated testing tools, frontend code can be made highly secure. Performance should also be optimized through techniques like lazy loading, HTTP/3 adoption, and a focus on core web vitals. As new technologies and methodologies emerge, developers must stay up-to-date to balance seamless user experiences with robust security. Keeping these considerations central in 2024 and beyond will ensure frontend services provide fast, smooth, and secure experiences that users have come to expect.
#frontend development#frontend development company#frontend development agency#frontend development services
0 notes
Photo

Vue JS 2 Tutorial #29 – Input Binding (Creating a blog, part 1) Hey gang, in this Vue JS 2 tutorial we'll start to create our small blog application. The first thing we'll cover is input binding. ----- COURSE LINKS: + Repo ... source
#binding#blog#Creating#Input#input binding#input binding tutorial#input modiefiers#Part#tutorial#v-model#vue#vue forms#vue input#vue js#vue js 2#vue js 2 input binding#vue js 2 tutorial#vue js 2 tutorial for beginners#vue js forms#vue js input binding#vue js tutorial#vue js tutorial for beginners#vue js v-model#vue v-model#vuejs#vuejs 2 tutorial#vuejs tutorial#vujs tutorial for beginners
0 notes
Text
Best Institutes for Python Training in Chandigarh
Best Institutes for Python Training in Chandigarh
Some basic introduction about python programming before doing Python training in Chandigarh:-

Python Programming Language
Python is a computer programming language often used to build websites and software, automate tasks, and conduct data analysis. Its high-level built in data structure, combined with dynamic typing and dynamic binding, make it very attractive for Rapid Application Development, as well as for use as a scripting or glue language to connect existing components together. Debugging Python programs is easy: a bug or bag input will never cause a segmentation fault. It has syntax that allows developers to write programs with fewer lines than some other programming language. Python uses new lines to complete a command, as opposed to other use semicolons or parentheses.
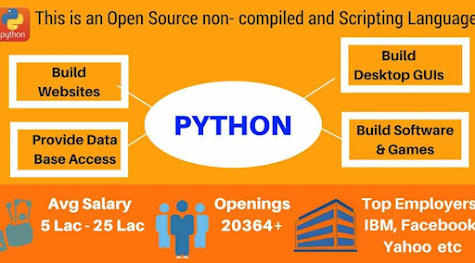
How to be a expert web developer?
Web Developer have an understanding of HTML, CSS, and JavaScript. It's also recommended to learn about CSS and CSS frameworks. Web development is help user to learn coding and build websites using different programming language. By enrolling these training programs, proficient in web development, and you will be the master the skills in backend programming and APIs that will round out complete full-stack skills. Developing these fundamental web development skill will give you the foundation and logic for communicating with programming language. Python is constantly growing and compared to other languages such as java and C++, Python's easy syntax and readability make learning it a lot easier. Web Developer usually fall under one of three categories: Back-end developer, Front-end developer , and full-stack developer. Some web developers also work as webmasters.
Types of Web Developers
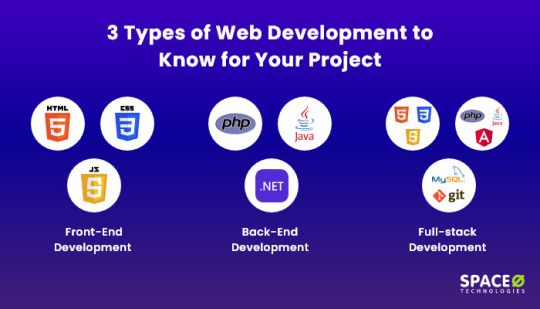
There are three main types of Web Developer :-
Front-End Developer
Front-end web development is the development of the graphical user interface of a website, through the use of HTML, CSS and JavaScript, so that user can view and interact with that website. It works on the visual part of the website- the pages visitors see and interact with ( also known as the user interface). These web developer focus on the user-facing sides of websites.
Basic setup and learning how to learn
Web standards and best practices (such as accessibility and cross-browser compatibility)
HTML, the language that gives web content structure and meaning
CSS, the language used to style web pages
JavaScript, the scripting language used to create dynamic functionality on the web
Tooling that is used to facilitate modern client-side web development
Back-End Developer
Back-end Development by building real-world projects like developers in top companies. Back-end development means working on server-side software, which focuses on everything you can't see on a website. Back-end developers ensure the website performs correctly, focusing on databases, back-end logic, application programming interface(APIs), architecture, and servers. They often design database and use languages like PHP, CSS, or Python.
Write high-quality code
perform quality code
Perform quality assurance (QA) testing
Assess efficiency and speed
Troubleshoot and debug
Train and support
Full-Stack Developer
Full-stack web developers combine front-end and back-end developer. Full stack web developer develop both client and server software. They can programs UI using Angular or React , server-side using Node. js or Express and use MongoDB as the Database. These developers have the knowledge to build a complete website and may work for organizations that don't have the budget for a large website team.
Program a browser (like using JavaScript, jQuery, Angular, or Vue)
Program a server (like using PHP, ASP, Python, or Node)
Program a database(like using SQL, SQLite, or MongoDB)
Now I'll tell you about the Best Institutes for Python Training in Chandigarh:-
There are many institute for python training in Chandigarh and Excellence Technology one of them is:-
Excellence Technology
Excellence Technology is one of the top python training institute in Chandigarh. It also provide professional carrier oriented course for students Like, Web Designing course in Chandigarh, Digital Marketing Training in Chandigarh, Java Training in Chandigarh and more as per the requirement. Excellence Technology offers java training in Mohali. With new technology getting launched every few months, students are confused on what technology they learn. Those who are not interest in programming or coding can make up their career in digital marketing. Days of Traditional marketing are gone now. So we provide Best Digital Marketing in Chandigarh, Panchkula and Mohali.

64.media.tumblr.com
www.excellencetechnology.in
Extech Digital
Extech Digital is a result driven Digital Marketing Company in Melbourne. We are a reliable internet marketing company that provides digital services to clients. Extech Digital have an excellent team of professionals and technical expertise. We help you create and optimize your business online & help you generate more leads. We are 100% result focused Digital Marketing Company in Chandigarh focusing on generating more & more leads & conversions for our clients.

64.media.tumblr.com
in.linkedin.com
Soft Edutech
Soft Edutech:- Soft Edutech are professional for providing Computer Hardware, Software, Networking, Website Designing, Development, Digital Marketing, Domain Name Registration, Web Hosting, Computer Networking, Infrastructure and IT Staffing Service. We have strategy, experience & an emphatic track record in increasing leads for our global clients. Digital Marketing services catered by us deliver a quintessential platform for our clients in the best possible way.
www.softedutech.com

www.softedutech.com
Anchal Thakur is a content writer of the India. She is graduated in BCA (Bachelor in Computer Application) and Digital Marketing. Anchal also written several contents on different Language and Stream trip. She is an inspiration to many, having progressed from the humble beginnings of content writing to being one of India's most sought-after Digital Marketing and Content Writing professionals. She consistently produces engaging and educational content that is beneficial to everyone. Anchal is well-known for promoting her content across several platforms.
#webdevelopment#webdevelopmentcompany#python#pythoncode#pythonprogramminglanguage#pythonprogramming#coding#Programming#programminglanguage#programmings#programmingstudents#programmingcontest#programming
0 notes
Text
Angular JavaScript Framework
Angular.js is an open-source framework for building strong online applications. It enables developers to create clear and concise application components by scaling the HTML syntax higher and using HTML as a template language. Because of its data binding and dependency injection features, you can write a lot less code and still obtain more functionality.
Direct access to the browser is available for all of these actions. As a result, as opposed to all the buzz about TezJS or Angular vs. React vs. Vue, Angular web frameworks can be the real deal for any server and business.
In other words, Angular JS is HTML modified for apps. The popularity of HTML is due to its utility in static pages, yet it is not ideal when creating software applications.

Popular AngularJS Frameworks for Web App Development
With Angular JS, there are several progressive frameworks with built-in web components and top AngularJS development tools accessible. The top 11 AngularJS frameworks are listed here if you wish to build cutting-edge web apps.
1. LumX
LumX is one of the most flexible front-end development frameworks for Angular.js. It allows you to develop UI that is both aesthetically beautiful and user-friendly using Google Material Design concepts.
The best CSS framework for Angular is this SaaS-based framework. Customizing the style and feel of your online application is something you might want to think about. The application's performance is improved by efficiently using Gulp to optimise your JS files and SaaS.
2. UI Bootstrap
As the name would suggest, this Angular UI framework uses the dynamic front-end tool for app development. UI Bootstrap has many components with repository dependencies, including Angular-animate, Angular-touch, and Bootstrap CSS.
This impressive framework provides a multitude of tools so you may benefit from Angular JS's rapid web development cycle. Most importantly, without relying on jQuery, JavaScript, or Bootstrap, it may effectively improve the efficiency of your online project.
3. Suave UI
This well-known AngularJS framework is very helpful in designing a user interface (UI) for your online application that is visually appealing. Suave UI's vast library of directives, CSS definitions (including the grid, layered elements, and coloured buttons), and services, which let programmers play around with various UI elements, are its strongest feature.
There is no longer a requirement to include each UI component separately because the UI components are contained in bundle files as well. For developers to accomplish the job through browsers, they only need to issue one command.
4. Ionic
Ionic is a well-known Angular JavaScript framework that may help you create dependable and successful web applications. This completely Angular.js-based platform-independent framework, which enables developers to employ its capabilities on highly interactive applications, fairly dispels the myth about Angular and Angular.js.
Thanks to integrated JS and CSS components, Ionic enables you to cover the majority of the front-end portion. In addition, if new features are needed for the pre-configured CSS classes, you can add them. A free, open-source SDK is also available from Ionic for building user-friendly apps. All things considered, Ionic and AngularJS can be a wonderful match for your web development project.
5. Angular Material
It's a substantial set of UI components that you can use to create consistent and elegant user interfaces, including Datepickers, Inputs, Data Tables, and Cards. It is possible to make use of the Material Design Specification-compliant default styling for each component. Using this Angularjs widget framework, you may change both the behaviour and appearance of your web app components.
There is a sizable CSS library included with Angular Material that contains typography and other useful components. It offers a variety of theming options, robust flex grid layouts, and responsive directives, which together allow for more rapid and flexible Angular app development.
6. Quantum UI
An AngularJS-based framework that speeds up front-end development is Quantum UI, which offers more than 60 rest-service and server-friendly UI components. It has an MVVM architecture and supports a Bootstrap-focused CSS structure.
GitHub is primarily responsible for hosting and maintaining this Angular testing framework. JS is not required because Quantum UI can only be customised using properties and attributes. Although most of its parts are free and open-source, some of them are not and need payment to use.
7. Angular UI Grid
This design has changed the way we think about developing web applications with substantial databases. A number of highly useful capabilities, like e2e testing, visualisation, user interactions, filtering, grouping, and sorting, are offered by Angular UI Grid, which has no additional dependencies outside Angular JS.
Additionally, it enables the native implementation of Angular.js without the requirement for jQuery. Your web app's technical debt can be reduced by using only the capabilities that are required thanks to the plugin design. You may also edit the CSS file and utilise its built-in customizer to change the look and feel of your website as a whole.
8. PrimeNG
The revolutionary JavaScript Building the front end of challenging projects is made easier by the declarative UI architecture of the Angular framework. The diverse library that comes with PrimeNG has more than 70 different UI components. If you want to work on one of its projects, Angular has a lot to offer you, from native themes to pre-built widgets.
With PrimeNG, one of the top front-end web development frameworks, you can easily incorporate a variety of front-end components into your online app, including charts, form inputs, overlays, menus, and more. It offers widgets that you can use in compliance with the MIT licence and that are completely free and open-source.
9. Angular UI Tree
Angular UI Tree is a popular Angular UI framework that is mostly used for sorting hierarchical lists. It also features drag-and-drop capabilities and does not require jQuery, making it simple to change any tree item. For data binding, Angular UI Tree makes use of the built-in AngularJS scope and helps components avoid child nodes.
The problem is that this paradigm is not enough. You will need another AngularJS module or framework to build the entire front-end of your web application.
10. Radian
Thanks to this free and open-source JS framework, developers may easily express plots in HTML texts. You can use unique HTML components in place of building your own JS charting code. With the help of the Angular.js framework, it provides effective capabilities for enabling two-way data binding in JavaScript variables and HTML components.
Additionally, Radian generates graphics using the D3.js plotting tool, allowing us to produce plots as SVG components. Then, any contemporary browser can show the SVG components immediately within the page. To help you get started, this Angular JS widget framework provides detailed documentation and a customizable licence.
11. Foundation
Foundation Foundation is one of the best front-end frameworks on the market right now. It produces a responsive user interface design that is much faster for every medium, device, and accessibility. Its extensive adaptability, flexibility, readability, and semantic features make it simple to create beautiful online and mobile apps.
The Foundation team frequently releases new resources and tools, like as HTML templates and code snippets. The trigger, process bar, dropdown, accordion, alert, and other semantic HTML elements are only a few examples of this framework's semantic HTML components.
#angular#html#javascript#css#programming#java#reactjs#python#nodejs#webdevelopment#php#webdeveloper#coding#react#vuejs#software#js#developer#softwaredeveloper#webdesign#programmer#jquery#android#coder#code#angularjs#webdesigner#frontend#laravel#mongodb
0 notes
Text
Harness the power of Angular and Ionic for Building World-class Apps!

Angular development has become one of the best approaches for designing highly-intuitive applications and when clubbed with a finely-tuned Ionic framework, the combination becomes all the more powerful and leads to the creation of beautifully designed user-centric hybrid mobile apps. This combination has already being used for countless projects worldwide. Consequently, Ionic and Angular JS app development services are highly being preferred by diverse industrial domains for various applications.
So please read the below post to know more about these vibrant technologies and the benefits that their combination offers.
What is Angular?
Angular is an open-source framework maintained by Google. It is a client-side development framework. It was developed by Misko Hevery, an engineer at Brat Tech LLC in 2009, and was released in the market in 2012; the first version being AngularJS. This framework comes with a host of tools and libraries for the AngularJS app developers to easily be able to create robust feature-rich apps for diverse client needs. Also, it helps to develop and test the virtual platforms; as a result, it can be utilized for Enterprise apps. Some of the top features of this framework are:
Two-way data binding
Filters
Model View Controller (MVC)
Templates
Licensed under the Apache license version 2.0
Directives
What is Ionic?
Ionic is an open-source software development kit (SDK) that ensures faster and cost-effective app development of mobile apps, desktop apps, PWAs, etc. with the utilization of technologies like HTML5, CSS, SASS, etc. It was developed on top of AngularJS in the year 2013 by Max Lynch, Adam Bradley,and Ben Sperry of Drifty Co. Today, it has also added the support for React and Angular, support for Vue is still under development.
Ionic app development mainly focuses on the front-end. It is an innovative SDK that enables the development of top-grade personal and commercial apps. The development of Ionic apps is easier since Ionic is easier to learn and implement and fun for the developers. Some of the Ionic’s features are given below:
Dependency Injection
Platform Independence
Intuitive User Interface
Cordova Plugins
High Adaptability
CSS and JavaScript Components
Ionic CLI
Ionic View
MIT License
Combined Benefits of Both Technologies- Angular and Ionic

One-Stop Solution for Several Platforms: Long back, the developers needed to create separate codes for Android, Windows, iOS, etc. But AngularJS and Ionic changed this scenario and allow developing multiple apps with a single codebase. Such apps can be easily downloaded from the application stores and run on any platform or device.
Reusable App Logic: Fusing AngularJS and Ionic enables the developers to separate user interfaces, system logic, and data models. This means that the developers can parallelly reuse the logic and also customize the UI for different gadgets and different platforms like iOS, Android, Windows, etc. This reusability of the app logic has made the process less time-consuming and less expensive.
Ionic’s Components and Features: Creating innovative icons and splash screens is a challenging task, especially for hybrid app development. For developing splash screens, the developers have to consider several parameters like length, density, width, type of device, etc. Ionic is a native-style UI kit that comes with various amazing features and components for making the development process hassle-free. Ionic’s .png, .ai, or .psd extensions help in building two files that enable smooth development of icons, splash screens, etc. and aesthetically appealing designs.
Angular’s Three-way Data-Binding: Angular allows three-way data binding which means it enables simultaneous updating of the data model, UI as well as backend data in a hassle-free manner. So, when the in-memory data and UI are in sync with backend service data, the chances of user data staying complete across the devices are much higher. This also means that in Angular, it is easy to take the users’ inputs, process the information, save it on the server, and hence keeping the user interface synched with the backend is much easier.
Testability: Testing is the most essential process once the apps are developed. It is a complicated and time-intensive process. But AngularJS eases out the testing process to a certain extent due to the Dependency Injection (DI) feature. This feature lets the developers fetch the pieces of the code from anywhere and duplicates the code for testing purposes. This means that the real components are replaced for the ones that fake the functionality.
Additional Benefits of Ionic App Development: Ionic plays a significant role in app development due to its potential in debugging, performance-boosting qualities, and the ability to create attractive UI. The Ionic developers can take advantage of $ionicConfigProvider elaborate transition, style, or behavioral pattern. It creates the elements as per the device’s layout and also abides by the guidelines while utilizing the elements on diverse devices. Also, Ionic apps are built in a modular fashion, hence it is easy to update and maintenance-free.
Another noteworthy feature of the Ionic is the Command-line interface i.e. CLI. It enables the development, implementation, and testing of any application on multiple platforms using a single command. This improves productivity and saves time for developers.
Conclusion: Combined Effect of AngularJS and Ionic
AngularJS framework is known for delivering robust performance and captivating front-end for the apps. On top of that, when it is clubbed with Ionic, it unlocks new possibilities for developing captivating apps. Ionic has attractive themes and availability of several components that help in the creation of an outstanding UI. This ultimately elevates the user experience and also retains the end-users. Moreover, both frameworks make the development process quite easier and faster for developers and cost-effective for businesses. So, if you want to build apps using Ionic and AngularJS, connect with an Ionic app development company or an AngularJS app development company and share the ideas with them to build a cutting edge app.
We hope this blog was useful to you!
You can mail us at [email protected] for your requirements!
0 notes
Link
In 2020, we are blessed with a number of frameworks and libraries to help us with web development. But there wasn't always so much variety. Back in 2005, a new scripting language called Mocha was created by a guy named Brendan Eich. Months after being renamed to LiveScript, the name was changed again to JavaScript. Since then, JavaScript has come a long way.
In 2010, we saw the introduction of Backbone and Angular as the first JavaScript frameworks and, by 2016, 92 per cent of all websites used JavaScript. In this article, we are going to have a look at three of the main JavaScript frameworks (Angular, React and Vue) and their status heading into the next decade.
For some brilliant resources, check out our list of top web design tools, and this list of excellent user testing software, too.
01. Angular
AngularJS was released in 2010 but by 2016 it was completely rewritten and released as Angular 2. Angular is a full- blown web framework developed by Google, which is used by Wix, Upwork, The Guardian, HBO and more.
Pros:
Exceptional support for TypeScript
MVVM enables developers to separate work on the same app section using the same set of data
Excellent documentation
Cons:
Has a bit of a learning curve
Migrating from an old version can be difficult.
Updates are introduced quite regularly meaning developers need to adapt to them
What's next?
In Angular 9, Ivy is the default compiler. It's been put in place to solve a lot of the issues around performance and file size. It should make applications smaller, faster and simpler.
When you compare previous versions of Angular to React and Vue, the final bundle sizes were a lot a bigger when using Angular. Ivy also makes Progressive Hydration possible, which is something the Angular team showed off at I/O 2019. Progressive Hydration uses Ivy to load progressively on the server and the client. For example, once a user begins to interact with a page, components' code along with any runtime is fetched piece by piece.
Ivy seems like the big focus going forward for Angular and the hope is to make it available for all apps. There will be an opt-out option in version 9, all the way through to Angular 10.
02. React
React was initially released in 2013 by Facebook and is used for building interactive web interfaces. It is used by Netflix, Dropbox, PayPal and Uber to name a few.
Pros:
React uses the virtual DOM, which has a positive impact on performance
JSX is easy to write
Updates don't compromise stability
Cons:
One of the main setbacks is needing third-party libraries to create more complex apps
Developers are left in the dark on the best way to develop
What's next?
At React Conf 2019, the React team touched on a number of things they have been working on. The first is Selective Hydration, which is where React will pause whatever it's working on in order to prioritise the components that the user is interacting with. As the user goes to interact with a particular section, that area will be hydrated. The team has also been working on Suspense, which is React's system for orchestrating the loading of code, data and images. This enables components to wait for something before they render.
Both Selective Hydration and Suspense are made possible by Concurrent Mode, which enables apps to be more responsive by giving React the ability to enter large blocks of lower priority work in order to focus on something that's a higher priority, like responding to user input. The team also mentioned accessibility as another area they have been looking at, by focusing on two particular topics – managing focus and input interfaces.
03. Vue
Vue was developed in 2014 by Evan You, an ex-Google employee. It is used by Xiaomi, Alibaba and GitLab. Vue managed to gain popularity and support from developers in a short space of time and without the backing of a major brand.
Pros:
Very light in size
Beginner friendly – easy to learn
Great community
Cons:
Not backed by a huge company, like React with Facebook and Angular with Google
No real structure
What's next?
Vue has set itself the target of being faster, smaller, more maintainable and making it easier for developers to target native. The next release (3.0) is due in Q1 2020, which includes a virtual DOM rewrite for better performance along with improved TypeScript Support. There is also the addition of the Composition API, which provides developers with a new way to create components and organise them by feature instead of operation.
Those developing Vue have also been busy working on Suspense, which suspends your component rendering and renders a fallback component until a condition is met.
One of the great things with Vue's updates is they sustain backward compatibility. They don't want you to break your old Vue projects. We saw this in the migration from 1.0 to 2.0 where 90 per cent of the API was the same.
How does the syntax of frameworks compare?
All three frameworks have undergone changes since their releases but one thing that's critical to understand is the syntax and how it differs. Let's have a look at how the syntax compares when it comes to simple event binding:
Vue: The v-on directive is used to attach event listeners that invoke methods on Vue instances. Directives are prefixed with v- in order to indicate that they are special attributes provided by Vue and apply special reactive behaviour to the rendered DOM. Event handlers can be provided either inline or as the name of the method.
React: React puts mark up and logic in JS and JSX, a syntax extension to JavaScript. With JSX, the function is passed as the event handler. Handling events with React elements is very similar to handling events on DOM elements. But there are some syntactic differences; for instance, React events are named using camelCase rather than lowercase.
Angular: Event binding syntax consists of a target event name within parentheses on the left of an equal sign and a quoted template statement on the right. Alternatively, you can use the on- prefix, known as the canonical form.
Popularity and market
Let's begin by looking at an overall picture of the three frameworks in regards to the rest of the web by examining stats from W3Techs. Angular is currently used by 0.4 per cent of all websites, with a JavaScript library market share of 0.5 per cent. React is used by 0.3 per cent of all websites and a 0.4 per cent JavaScript library market share and Vue has 0.3 per cent for both. This seems quite even and you would expect to see the numbers rise.
Google trends: Over the past 12 months, React is the most popular in search terms, closely followed by Angular. Vue.js is quite a way behind; however, one thing to remember is that Vue is still young compared to the other two.
Job searches: At the time of writing, React and Angular are quite closely matched in terms of job listings on Indeed with Vue a long way behind. On LinkedIn, however, there seems to be more demand for Vue developers.
Stack Overflow: If you look at the Stack Overflow Developer Survey results for 2019, React and Vue.js are both the most loved and wanted web frameworks. Angular sits down in ninth position for most loved but third most wanted.
GitHub: Vue has the most number of stars with 153k but it has the least number of contributors (283). React on the other hand has 140k stars and 1,341 contributors. Angular only has 59.6k stars but has the highest number of contributors out of the three with 1,579.
NPM Trends: The image above shows stats for the past 12 months, where you can see React has a higher number of downloads per month compared to Angular and Vue.
Mobile app development
One main focus for the big three is mobile deployment. React has React Native, which has become a popular choice for building iOS and Android apps not just for React users but also for the wider app development community. Angular developers can use NativeScript for native apps or Ionic for hybrid mobile apps, whereas Vue developers have a choice of NativeScript or Vue Native. Because of the popularity of mobile applications, this remains a key area of investment.
Other frameworks to look out for in 2020
If you want to try something new in 2020, check out these JavaScript frameworks.
Ember: An open-source framework for building web applications that works based on the MVVM pattern. It is used by several big companies like Microsoft, Netflix and LinkedIn.
Meteor: A full-stack JavaScript platform for developing modern web and mobile applications. It's easy to learn and has a very supportive community.
Conclusion
All three frameworks are continually improving, which is an encouraging sign. Everyone has their own perspective and preferred solution about which one they should use but it really comes down to the size of the project and which makes you feel more comfortable.
The most important aspect is the continued support of their communities, so if you are planning to start a new project and have never used any of the three before, then I believe you are in safe hands with all of them. If you haven't had a chance to learn any of the three frameworks yet, then I suggest making it your New Year's resolution to start learning. The future will revolve around these three.
0 notes
Text
Introducing Alpine.js: A Tiny JavaScript Framework | ArkssTech

Introducing Alpine.js: A Tiny JavaScript Framework Like most developers, I have a bad tendency to over-complicate my workflow, especially if there’s some new hotness on the horizon. Why use CSS when you can use CSS-in-JS? Why use Grunt when you can use Gulp? Why use Gulp when you can use Webpack? Why use a traditional CMS when you can go headless? Every so often though, the new-hotness makes life simpler. Recently, the rise of utility based tools like Tailwind CSS have done this for CSS, and now Alpine.js promises something similar for JavaScript. In this article, we’re going to take a closer look at Alpine.js and how it can replace JQuery or larger JavaScript libraries to build interactive websites. If you regularly build sites that require a sprinkling on Javascript to alter the UI based on some user interaction, then this article is for you. Throughout the article, I refer to Vue.js, but don’t worry if you have no experience of Vue — that is not required. In fact, part of what makes Alpine.js great is that you barely need to know any JavaScript at all. Now, let’s get started. What Is Alpine.js? According to project author Caleb Porzio: “Alpine.js offers you the reactive and declarative nature of big frameworks like Vue or React at a much lower cost. You get to keep your DOM, and sprinkle in behavior as you see fit.” Let’s unpack that a bit. Let’s consider a basic UI pattern like Tabs. Our ultimate goal is that when a user clicks on a tab, the tab contents displays. If we come from a PHP background, we could easily achieve this server side. But the page refresh on every tab click isn’t very ‘reactive’. To create a better experience over the years, developers have reached for jQuery and/or Bootstrap. In that situation, we create an event listener on the tab, and when a user clicks, the event fires and we tell the browser what to do. See the Pen Showing / hiding with jQuery by Phil on CodePen. See the Pen Showing / hiding with jQuery by Phil on CodePen. That works. But this style of coding where we tell the browser exactly what to do (imperative coding) quickly gets us in a mess. Imagine if we wanted to disable the button after it has been clicked, or wanted to change the background color of the page. We’d quickly get into some serious spaghetti code. Developers have solved this issue by reaching for frameworks like Vue, Angular and React. These frameworks allow us to write cleaner code by utilizing the virtual DOM: a kind of mirror of the UI stored in the browser memory. The result is that when you ‘hide’ a DOM element (like a tab) in one of these frameworks; it doesn’t add a display:none; style attribute, but instead it literally disappears from the ‘real’ DOM. This allows us to write more declarative code that is cleaner and easier to read. But this is at a cost. Typically, the bundle size of these frameworks is large and for those coming from a jQuery background, the learning curve feels incredibly steep. Especially when all you want to do is toggle tabs! And that is where Alpine.js steps in. WANT TO BUILD YOUR BUSINESS APP IN LARAVEL FRAMEWORK? ARKSSTECH, AGILE SOFTWARE DEVELOPMENT COMPANY OFFERS EXPERIENCED LARAVEL APP DEVELOPERS & TO HIRE LARAVEL DEVELOPERS FOR STARTUPS AND SMES. RENT A CODER TODAY!! Like Vue and React, Alpine.js allows us to write declarative code but it uses the “real” DOM; amending the contents and attributes of the same nodes that you and I might edit when we crack open a text editor or dev-tools. As a result, you can lose the filesize, wizardry and cognitive-load of larger framework but retain the declarative programming methodology. And you get this with no bundler, no build process and no script tag. Just load 6kb of Alpine.js and you’re away! Alpine.js JQuery Vue.js React + React DOM Coding style Declarative Imperative Declarative Declarative Requires bundler No No No Yes Filesize (GZipped, minified) 6.4kb 30kb 32kb 5kb + 36kb Dev-Tools No No Yes Yes WANT TO BUILD YOUR BUSINESS APP IN LARAVEL FRAMEWORK? ARKSSTECH, AGILE SOFTWARE DEVELOPMENT COMPANY OFFERS EXPERIENCED LARAVEL APP DEVELOPERS & TO HIRE LARAVEL DEVELOPERS FOR STARTUPS AND SMES. RENT A CODER TODAY!! When Should I Reach For Alpine? For me, Alpine’s strength is in the ease of DOM manipulation. Think of those things you used out of the box with Bootstrap, Alpine.js is great for them. Examples would be: Showing and hiding DOM nodes under certain conditions, Binding user input, Listening for events and altering the UI accordingly, Appending classes. You can also use Alpine.js for templating if your data is available in JSON, but let’s save that for another day. When Should I Look Elsewhere? If you’re fetching data, or need to carry out additional functions like validation or storing data, you should probably look elsewhere. Larger frameworks also come with dev-tools which can be invaluable when building larger UIs. From jQuery To Vue To Alpine Two years ago, Sarah Drasner posted an article on Smashing Magazine, “Replacing jQuery With Vue.js: No Build Step Necessary,” about how Vue could replace jQuery for many projects. That article started me on a journey which led me to use Vue almost every time I build a user interface. Today, we are going to recreate some of her examples with Alpine, which should illustrate its advantages over both jQuery and Vue in certain use cases. Alpine’s syntax is almost entirely lifted from Vue.js. In total, there are 13 directives. We’ll cover most of them in the following examples. Getting Started Like Vue and jQuery, no build process is required. Unlike Vue, Alpine it initializes itself, so there’s no need to create a new instance. Just load Alpine and you’re good to go. The scope of any given component is declared using the x-data directive. This kicks things off and sets some default values if required: ... Capturing User Inputs x-model allow us to keep any input element in sync with the values set using x-data. In the following example, we set the name value to an empty string (within the form tag). Using x-model, we bind this value to the input field. By using x-text, we inject the value into the innerText of the paragraph element. This highlights the key differences with Alpine.js and both jQuery and Vue.js. Updating the paragraph tag in jQuery would require us to listen for specific events (keyup?), explicitly identify the node we wish to update and the changes we wish to make. Alpine’s syntax on the other hand, just specifies what should happen. This is what is meant by declarative programming. Updating the paragraph in Vue while simple, would require a new script tag: new Vue({ el: '#app', data: { name: '' } }); While this might not seem like the end of the world, it highlights the first major gain with Alpine. There is no context-switching. Everything is done right there in the HTML — no need for any additional JavaScript. Click Events, Boolean Attributes And Toggling Classes Like with Vue, : serves as a shorthand for x-bind (which binds attributes) and @ is shorthand for x-on (which indicates that Alpine should listen for events). In the following example, we instantiate a new component using x-data, and set the default value of show to be false. When the button is clicked, we toggle the value of show. When this value is true, we instruct Alpine to append the aria-expanded attribute. x-bind works differently for classes: we pass in object where the key is the class-name (active in our case) and the value is a boolean expression (show). WANT TO BUILD YOUR BUSINESS APP IN LARAVEL FRAMEWORK? ARKSSTECH, AGILE SOFTWARE DEVELOPMENT COMPANY OFFERS EXPERIENCED LARAVEL APP DEVELOPERS & TO HIRE LARAVEL DEVELOPERS FOR STARTUPS AND SMES. RENT A CODER TODAY!! Hiding And Showing The syntax showing and hiding is almost identical to Vue. This will set a given DOM node to display:none. If you need to remove a DOM element completely, x-if can be used. However, because Alpine.js doesn’t use the Virtual DOM, x-if can only be used on a (tag that wraps the element you wish to hide). Magic Properties In addition to the above directives, three Magic Properties provide some additional functionality. All of these will be familiar to anyone working in Vue.js. $el fetches the root component (the thing with the x-data attribute); $refs allows you to grab a DOM element; $nextTick ensures expressions are only executed once Alpine has done its thing; $event can be used to capture a nature browser event. Let’s Build Something Useful It’s time to build something for the real world. In the interests of brevity I’m going to use Bootstrap for styles, but use Alpine.js for all the JavaScript. The page we’re building is a simple landing page with a contact form displayed inside a modal that submits to some form handler and displays a nice success message. Just the sort of thing a client might ask for and expect pronto!

Initial view (Large preview)
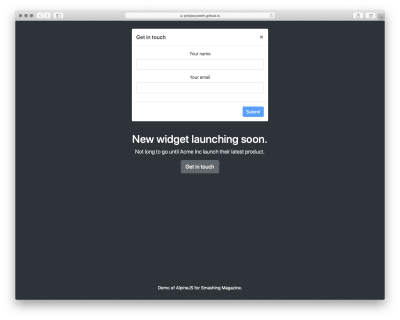
Modal open (Large preview)
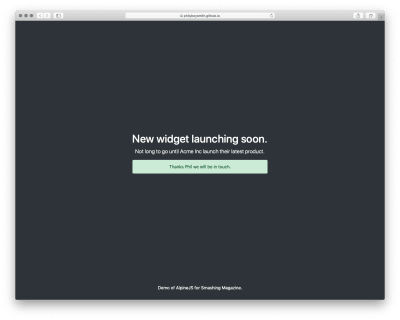
Success message (Large preview) Note: You can view the original markup here. WANT TO BUILD YOUR BUSINESS APP IN LARAVEL FRAMEWORK? ARKSSTECH, AGILE SOFTWARE DEVELOPMENT COMPANY OFFERS EXPERIENCED LARAVEL APP DEVELOPERS & TO HIRE LARAVEL DEVELOPERS FOR STARTUPS AND SMES. RENT A CODER TODAY!! To make this work, we could add jQuery and Bootstrap.js, but that is quite a bit of overhead for not a lot of functionality. We could probably write it in Vanilla JS, but who wants to do that? Let’s make it work with Alpine.js instead. First, let’s set a scope and some initial values: Now, let’s make our button set the showModal value to true: Get in touch When showModal is true, we need to display the modal and add some classes: Let’s bind the input values to Alpine: And disable the ‘Submit’ button, until those values are set: Submit Finally, let’s send data to some kind of asynchronous function, and hide the modal when we’re done: Submit And that’s about it! Just Enough JavaScript When building websites, I’m increasingly trying to ask myself what would be “just enough JavaScript”? When building a sophisticated web application, that might well be React. But when building a marketing site, or something similar, Alpine.js feels like enough. (And even if it’s not, given the similar syntax, switching to Vue.js takes no time at all). It’s incredibly easy to use (especially if you’ve never used VueJS). It’s tiny ( There are more advanced features that aren’t included in this article and Caleb is constantly adding new features. If you want to find out more, take a look at the official docs on Github. WANT TO BUILD YOUR BUSINESS APP IN LARAVEL FRAMEWORK? ARKSSTECH, AGILE SOFTWARE DEVELOPMENT COMPANY OFFERS EXPERIENCED LARAVEL APP DEVELOPERS & TO HIRE LARAVEL DEVELOPERS FOR STARTUPS AND SMES. RENT A CODER TODAY!! Read the full article
#bestbrowsersforwebdesign#designsystems#webdesignbrowsers#webdesigncomponents#webdesigntools#webdesignworkflow
0 notes
Text
勉強2020/02/11 vue.js
https://www.udemy.com/course/vue-js-complete-guide/learn/lecture/15371412#overview
117, 118, 119, 120, 121
v-model
フォームにbindして使う。
<input id="title" type="text" v-model="eventData.title" />
v-model.lazyを使うとフォー���スが外れたら(onchange?)発火する
v-model.number 数字として扱い続けたいときに使う。
v-model.trim 前後の空白を無視する。
0 notes
Photo

An Introduction to Data Visualization with Vue and D3.js
Web applications are normally data-driven and oftentimes the need arises to visualize this data. That’s where charts and graphs come in. They make it easier to convey information, as well as demonstrate correlations or statistical relationships. Information presented in the form of a chart or a graph is also easier for a non-native speaker to understand.
In this tutorial, we’ll learn how to visualize data in a Vue project. For this, we’ll be using the popular D3.js library, which combines powerful visualization components and a data-driven approach to DOM manipulation.
Let’s get started.
Note: the code for this tutorial can be found on GitHub.
What is D3?
As you can read on the project’s home page, D3.js is a JavaScript library for manipulating documents based on data. D3 helps you bring data to life using HTML, SVG, and CSS. Its emphasis on web standards gives you the full capabilities of modern browsers without tying yourself to a proprietary framework.
Whereas most people will refer to D3.js as a data visualization library, it’s not. D3 is more of a framework comprising different parts — such as jQuery parts (which help us select and manipulate DOM elements), Lodash parts, animation parts, data analysis parts, and data visualization parts.
In this tutorial, we’ll be working with the visualization aspect of D3. The real meat of D3 when visualizing data is:
the availability of functions for decorating data with drawing instructions
creating new drawable data from source data
generating SVG paths
creating data visualization elements (like an axis) in the DOM from your data and methods
What We’ll Be Building
We want to create an app that lets users search for a repo on GitHub, then get a visual representation of issues opened in the past week that are still open. The end result will look like this:

Prerequisites
This tutorial assumes you have a working knowledge of Vue. Previous knowledge of D3.js isn’t required, but if you’d like to get up to speed quickly, you might want to read our D3 by example tutorial.
You’ll also need to have Node installed on your system. You can do this by downloading the binaries for your system from the official website, or using a version manager.
Finally, we’ll be using the following packages to build our app:
Vue CLI — to scaffold out the project
D3.js — to visualize our data
Lodash — which provides a handful of utility methods
Moment JS — for date and time formatting
axios — an HTTP client to help us make requests to an external API
New Vue Project
I prefer creating new Vue projects using Vue CLI. (If you’re not familiar with Vue CLI, our beginner’s guide in this Vue series gives a full introduction.) Vue CLI provides a nice folder structure for placing different sections of the code, such as styles, components, and so on.
Make sure that the CLI is installed on your machine:
npm install -g @vue/cli
Then create a new project with the following command:
vue create issues-visualization
Note: while creating a new project using Vue CLI, you’ll be prompted to pick a preset. For this particular project, we’ll just stick with the default (Babel + ESLint).
Once our new Vue project has been created, we cd into the project folder and add the various node modules we’ll need:
npm install lodash d3 axios moment
Even though this is a simple app that doesn’t have many running parts, we’ll still take the components approach instead of dumping all the code inside the App.vue file. We’re going to have two components, the App component and a Chart component that we’re yet to create.
The App component will handle fetching data from GitHub, then pass this data to the Chart component as props. The actual drawing of the chart will happen inside the Chart component. Structuring things this way has the advantage that, if you want to use a library other than axios to fetch the data, it’ll be easier to swap it out. Also, if you want to swap D3 for a different charting library, that’ll be easier too.
Building the Search Interface
We’ll start by building a search interface that lets users enter the name of the repo they want to see visualized.
In src/App.vue, get rid of everything inside the <template> tag and replace the content with this:
<template> <div id="app"> <form action="#" @submit.prevent="getIssues"> <div class="form-group"> <input type="text" placeholder="owner/repo Name" v-model="repository" class="col-md-2 col-md-offset-5" > </div> </form> </div> </template>
Here we have a form which, upon submission, prevents the browser’s default submission action, then calls a getIssues method that we’re yet to define. We’re also using a v-model directive to bind the input from the form to a repository property inside the data model of our Vue instance. Let’s declare that property repository as an empty string. We’ll also add a startDate property, which we’ll later use as the first date in our time range:
import moment from "moment"; import axios from "axios"; export default { name: "app", data() { return { issues: [], repository: "", startDate: null }; }, methods: { getIssues() { // code goes in here } } };
Now on to creating the getIssues method:
getIssues() { this.startDate = moment() .subtract(6, "days") .format("YYYY-MM-DD"); axios .get( `https://api.github.com/search/issues?q=repo:${this.repository}+is:issue+is:open+created:>=${this.startDate}`, { params: { per_page: 100 } } ) .then(response => { const payload = this.getDateRange(); response.data.items.forEach(item => { const key = moment(item.created_at).format("MMM Do YY"); const obj = payload.filter(o => o.day === key)[0]; obj.issues += 1; }); this.issues = payload; console.log(this.issues); }); }
In the above block of code, we start by setting the startDate data property to six days ago and formatting it for use with the GitHub API.
We then use axios to make an API request to GitHub to get all issues for a particular repository that were opened in the past week and that are still open. You can refer to GitHub’s search API if you need more examples on how to come up with query string parameters.
When making the HTTP request, we set the results count to 100 per page (the max possible). There are hardly any repositories with over 100 new issues per week, so this should be fine for our purposes. By default, the per_page value is 30.
If the request completes successfully, we use a custom getDateRange method to initialize a payload variable that we will be able to pass to the Chart component. This payload is an array of objects that will like so:
[ {day: "Dec 7th 18", issues: 0}, {day: "Dec 8th 18", issues: 0}, {day: "Dec 9th 18", issues: 0}, {day: "Dec 10th 18", issues: 0}, {day: "Dec 11th 18", issues: 0}, {day: "Dec 12th 18", issues: 0}, {day: "Dec 13th 18", issues: 0} ]
After that, we iterate over the API’s response. The data we’re interested in is in an items key on a data property on the response object. From this, we take the created_at key (which is a timestamp) and format it as the day property in our objects above. From there, we then look up the corresponding date in the payload array and increment the issues count for that date by one.
Finally, we assign the payload array to our issues data property and log the response.
Next, let’s add in the getDateRange method:
methods: { getDateRange() { const startDate = moment().subtract(6, 'days'); const endDate = moment(); const dates = []; while (startDate.isSameOrBefore(endDate)) { dates.push({ day: startDate.format('MMM Do YY'), issues: 0 }); startDate.add(1, 'days'); } return dates; }, getIssues() { ... } }
Before we get to the visualization bit, let’s also log any errors we might encounter when making our request to the console (for debugging purposes):
axios .get( ...) .then(response => { ... }) .catch(error => { console.error(error); });
We’ll add some UX for informing the user in the case that something went wrong later.
So far, we have an input field that lets the user enter the organization/repository name they wish to search issues for. Upon form submission, all issues opened in the past one week are logged to the console.
Below is an example of what was logged on the console for the facebook/react repo:

If you start up the Vue dev server using npm run serve and enter some different repos, you should see something similar. If you’re stuck for inspiration, check out GitHub’s Trending page.
Next comes the fun bit — visualizing this data.
Drawing a Bar Chart Using D3
Earlier on, we mentioned that all the drawing will be handled inside a Chart component. Let’s create the component:
touch src/components/Chart.vue
D3 works on SVG elements, and for us to draw anything with D3, we need to have an SVG element on the page. In our newly created component (src/components/Chart.vue), let’s create an SVG tag:
<template> <div> <svg></svg> </div> </template>
For this particular tutorial, we’ll visualize our data using a bar chart. I picked a bar chart because it represents a low complexity visual element while it teaches the basic application of D3.js itself. The bar chart is also a good intro to the most important D3 concepts, while still having fun!
Before proceeding, let’s update our App component to include the newly created Chart component below the form:
<template> <div id="app"> <form action="#" @submit.prevent="getIssues"> ... </form> <chart :issues="issues"></chart> </div> </template>
Let’s also register it as a component:
import Chart from './components/Chart.vue'; export default { name: "app", components: { Chart }, ... }
Notice how we’re passing the value of the issues data property to the Chart component as a prop:
<chart :issues="issues"></chart>
Let’s now update our Chart component to make use of that data:
<script> import * as d3 from "d3"; import _ from "lodash"; export default { props: ["issues"], data() { return { chart: null }; }, watch: { issues(val) { if (this.chart != null) this.chart.remove(); this.renderChart(val); } }, methods: { renderChart(issues_val) { // Chart will be drawn here } } }; </script>
In the above code block, we’re importing D3 and Lodash. We then instantiate a chart data property as null. We’ll assign a value to this when we start drawing later on.
Since we want to draw the chart every time the value of issues changes, we’ve created a watcher for issues. Each time this value changes, we’ll destroy the old chart and then draw a new chart.
Drawing will happen inside the renderChart method. Let’s start fleshing that out:
renderChart(issues_val) { const margin = 60; const svg_width = 1000; const svg_height = 600; const chart_width = 1000 - 2 * margin; const chart_height = 600 - 2 * margin; const svg = d3 .select("svg") .attr("width", svg_width) .attr("height", svg_height); }
Here, we set the height and width of the SVG element we just created. The margin attribute is what we’ll use to give our chart some padding.
D3 comes with DOM selection and manipulation capabilities. Throughout the tutorial, you’ll see lot’s of d3.select and d3.selectAll statements. The difference is that select will return the first matching element while selectAll returns all matching elements.
The post An Introduction to Data Visualization with Vue and D3.js appeared first on SitePoint.
by Christopher Vundi via SitePoint https://ift.tt/2KdTjHU
0 notes
Photo

#5 User Input & Data Binding With v-model – VueJS For Everyone In this series, we dive into VueJS. I teach you all about the basics of Vue app development where we dive into VueJS fundamentals, VueJS Animations, API calls ... source
#amp#binding#data#Input#javascript#js tutorial#user#vmodel#vue#vue js#vue js 2 tutorial#vue js tutorial#vue js tutorial 2018#vue js tutorial for beginners#vue tutorial#vue.js help#vue2#vuejs#vuejs tutorial#vuejs tutorial 2017#vuejs tutorial 2018#vuejs tutorial video#vuejs tutorial youtube#web app development#web app development tutorial#web application development tutorial#web development tutorial#web development tutorial for beginners
0 notes
Text
Introduction to Client-Side Development
Introduction to client-side elements
Distributed systems use client-side elements, so that users can interact with.
The client-side elements include,
Views – what user see
Controller – contain event handlers for the views
Client-model – business logic and data
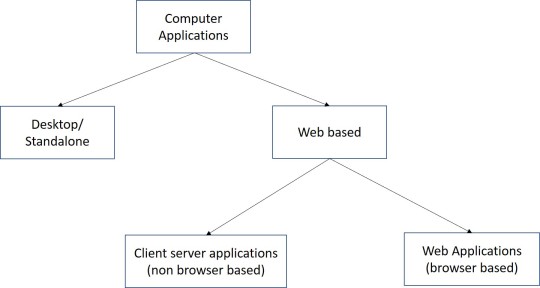
View Development
Browser-based clients’ Views comprises two main elements
Content – HTML
Formatting – CSS
HTML
HTML Elements
o Structural elements – header, footer, nav, aside
o Text elements – headings, paragraphs, line breaks
o Images
o Hyperlinks
o Data representational elements – Lists, Tables
o Form elements – Input, Radio buttons, Check boxes, Buttons
CSS (Cascading Style Sheets)
Used to decorate or format content.
Advantages:
Reduce HTML formatting tags
Easy modification
Faster loading
Save lot of work and time
Three main selectors of CSS
Element Selector
- Selects elements based on the name
ID Selector
- Uses the id attribute of HTML element to select a specific element
Class Selector
- Selects elements with a specific class attribute

Advanced selectors
Pseudo Classes Pseudo Elements
:link first-letter
:visited first-line
:hover first-child
Specificity:
Specificity is, which browser decide which css property values are the most relevant to an element and, therefore, will be applied.
Specificity is a weight that is applied to a given css declaration determined by the number of each selector type in the matching selector.
The following list of selector types increases by specificity
1. Type selector and pseudo elements
2. Class selectors, attribute selectors and pseudo classes
3. ID selectors
CSS Advanced features
Web fonts - Allow you to use custom fonts other than device fonts
Colors, gradients, backgrounds
Transformations and animations
Media
Media queries
Media queries can be used to check many things.
- Width and height of the viewport
- Width and height of the device
- Orientation
- Resolution
Can be used as
o Inline CSS
o Internal CSS sheets
o External CSS sheets
Inline CSS
Advantages:
Inline CSS can be used for many purposes, some of which include:
Testing: Many web designers use Inline CSS when they begin working on new projects, this is because its easier to scroll up in the source, rather than change the source file. Some also using it to debug their pages, if they encounter a problem which is not so easily fixed. This can be done in combination with the Important rule of CSS.
Quick-fixes: There are times where you would just apply a direct fix in your HTML source, using the style attribute, but you would usually move the fix to the relevant files when you are either able, or got the time.
Smaller Websites: The website such as Blogs where there are only limited number of pages, using of Inline CSS helps users and service provider.
Lower the HTTP Requests: The major benefit of using Inline CSS is lower HTTP Requests which means the website loads faster than External CSS.
Disadvantages
Inline CSS some of the disadvantages of which includes:
Overriding: Because they are the most specific in the cascade, they can over-ride things you didn’t intend them to.
Every Element: Inline styles must be applied to every element you want them on. So if you want all your paragraphs to have the font family “Arial” you have to add an inline style to each <p> tag in your document. This adds both maintenance work for the designer and download time for the reader.
Pseudo-elements: It’s impossible to style pseudo-elements and classes with inline styles. For example, with external and internal style sheets, you can style the visited, hover, active, and link color of an anchor tag. But with an inline style all you can style is the link itself, because that’s what the style attribute is attached to.
Internal CSS
Advantages
Since the Internal CSS have more preference over Inline CSS. There are numerous advantages of which some of important are an under:
Cache Problem: Internal styles will be read by all browsers unless they are hacked to hide from certain ones. This removes the ability to use media=all or @import to hide styles from old, crotchety browsers like IE4 and NN4.
Pseudo-elements: It’s impossible to style pseudo-elements and classes with inline styles. With Internal style sheets, you can style the visited, hover, active, and link color of an anchor tag.
One style of same element: Internal styles need not be applied to every element. So if you want all your paragraphs to have the font family “Arial” you have to add an Inline style <p> tag in Internal Style document.
No additional downloads: No additional downloads necessary to receive style information or we have less HTTP Request
Disadvantages
Multiple Documents: This method can’t be used, if you want to use it on multiple web pages.
Slow Page Loading: As there are less HTTP Request but by using the Internal CSS the page load slow as compared to Inline and External CSS.
Large File Size: While using the Internal CSS the page size increases but it helps only to Designers while working offline but when the website goes online it consumers much time as compared to offline.
External CSS
Advantages
There are many advantages for using external CSS and some of are:
Full Control of page structure: CSS allows you to display your web page according to W3C HTML standards without making any compromise with the actual look of the page.
Reduced file-size: By including the styling of the text in a separate file, you can dramatically decrease the file-size of your pages. Also, the content-to-code ratio is far greater than with simple HTML pages, thus making the page structure easier to read for both the programmer and the spiders.
Less load time: Today, when Google has included the Loading time in his algorithm, its become more important to look into the page loading time and another benefit of having low file-size pages translates into reduced bandwidth costs.
Higher page ranking: In the SEO, it is very important to use external CSS. In SEO, the content is the King and not the amount of code on a page. Search engines spider will be able to index your pages much faster, as the important information can be placed higher in the HTML document. Also, the amount of relevant content will be greater than the amount of code on a page. The search engine will not have to look too far in your code to find the real content. You will be actually serving it to the spiders “on a platter”.
There are many frameworks/libraries/plugins to support view development
o They dynamically generate HTML+CSS code
o In server and/or client side
o May have JS-based advanced interactive features
Other tools
jQuery - A JS library, but can be seen a framework too
jQuery UI - Focus on GUI development
Bootstrap - To rapidly design and develop responsive web pages and templates
Angular - A JS framework/platform to build frontend applications
React – A JavaScript library for building user interfaces
Templates are used to maintain consistency across pages in the web site/application.
Template engines are available for both server and client sides
Client-side (JS-based) template engines - NUNJUCKS, PUG, MUSTACHE.JS, HANDLEBARS
Server-side template engines - Twig, jTwig, Thymeleaf, Apache Velocity
Plug-ins
Plug-ins are mainly to add widgets to the Views
Component Development
Browser-based clients’ components comprises two main aspects
Controllers
Client-model
The components of browser-based clients are developed using JS/JS-based frameworks, libraries, and plugins.
Main features of client-side development tools
o DOM processing (dynamic content generation, change, removal)
o Data processing
o Data persistence
o Session management
o Communication
JS6 (JavaScript6)
Also called ECMAScript6
New features
JavaScript let
- The let statement allows you to declare a variable with block scope.
JavaScript const
- The const statement allows you to declare a constant
Exponentiation (**)
- The exponentiation operator (**) raises the first operand to the power of the second operand.
Default parameter values
- Default parameter values allows function parameters to have default values.
Array.find()
- The find() method returns the value of the first array element that passes a test function.
- function takes 3 arguments:
The item value
The item index
The array itself
Array.findIndex()
- The findIndex() method returns the index of the first array element that passes a test function.
- function takes 3 arguments:
The item value
The item index
The array itself
Web workers
This API is meant to be invoked by web application to spawn background workers to execute scripts which run in parallel to UI page
Web storage / Session storage
This is for persistent data storage of key-value pair data in Web clients.
GeoLocation
Identify the device location
File API
Handle the local files
Image capturing
Use local hardware
Top JS frameworks/ libraries
jQuery - Basic and simple. Cover the complexity of JS and provides cross-browser compatibility.
React - powers Facebook, Ease of Learning, DOM Binding, Reusable Components, Backward Compatibility
Angular - Support for Progressive Web Applications, Build Optimizer, Universal State Transfer API and DOM, Data Binding and MVVM
Vue – light weight, with a much-needed speed and accuracy
Generic client-side features
Form/ data validation
Dynamic content generating/updating
Some business logic
Delta communication
References
https://www.w3schools.com/css/css_syntax.asp
https://developer.mozilla.org/en-US/docs/Web/CSS/Specificity
https://www.w3schools.com/cssref/css3_pr_mediaquery.asp
https://vineetgupta22.wordpress.com/2011/07/09/inline-vs-internal-vs-external-css/
https://www.w3schools.com/js/js_es6.asp
0 notes
Link
Vue JS is an awesome JavaScript Framework for building Frontend Applications! VueJS mixes the Best of Angular + React!
What you’ll learn
Build amazing Vue.js Applications – all the Way from Small and Simple Ones up to Large Enterprise-level Ones
Understand the Theory behind Vue.js and use it in Real Projects
Leverage Vue.js in both Multi- and Single-Page-Applications (MPAs and SPAs)
Requirements
Basic JavaScript Knowledge is Required
ES6 Knowledge is a Plus but not a Must
Basic HTML and CSS Knowledge is assumed throughout the Course
Description
Hear what students are saying about the course:
He knows how to teach. Splits every details into smaller parts and makes another video for each part. For this reason you don’t feel yourself boring while watching videos because lots of them about 2-3 mins not more. One of the best teachers in Udemy that I saw.
The instructor uses an easy-to-follow approach that builds knowledge easily and incrementally.
Very well laid out tutorials that are easy to follow but also run at a pace that doesn’t get boring.
About the course
No matter at which Metric you look (Google Trends, Github Stars, Tweets …) VueJS is the Shooting Star in the World of JavaScript Frameworks – it simply is amazing!
Frontend Frameworks are extremely popular because they give us this reactive, great User Experience we know from Mobile Apps – but now in the Browser! No wonder that Jobs requiring Frontend Framework Skills like VueJS are amongst the best paid ones in the Industry!
You may know Angular 2 and ReactJS, well, VueJS combines the Best of both Frameworks and makes building anything from small Widgets to big, Enterprise-Level Apps a Breeze and a whole lot of Fun! And if you don’t know the two mentioned Frameworks: That’s fine, too, this Course does not expect any knowledge of any other Frontend Framework – you will learn it all throughout this Course!
### This Course covers it all! ###
We’ll start at the very Basics, what Vue.js is and how it works before we move on to more Complex and Advanced Topics but I’ll be honest: It’s too much to fit it all into one Sentence, so here’s what you’ll learn in this Course:
What is VueJS and Why would you use it?
Setting up a Development Environment and Workflow
The Basics (including the basic Syntax, Understanding Templates and much more!)
Interacting with DOM (Rendering Lists, Conditionally attaching/ detaching Elements …)
Using Components (and what Components are to begin with)
Binding to Form Inputs
All about Directives, Filters and Mixins
How to make your App more Beautiful with Animations and Transitions
How to create an awesome Single-Page-Application (SPA) with Routing
How to improve State Management by using Vuex
How to Deploy the App
And much more …
And all the accompanied with many Exercises and multiple Course Projects – because it isn’t just about seeing Code, it’s about using and practicing it!
### Is this Course for you? ###
Now that you know what this Course is about, let’s see if this Course is for you!
Here are three Types of Students who will love this Course:
Student #1:
Has some JavaScript Experience and is interested in what this Language can do. He heard and read that JavaScript allows you to create nice Web Applications and enhance existing Web Pages. VueJS is your choice!
Student #2:
He already has some Experience with other Frontend Frameworks like Angular (2) or ReactJS. But either due to interest or disappointment of the existing Frameworks, he seeks some Alternatives – VueJS might be what you were looking for!
Student #3:
Has Experience with backend Frameworks/ Languages but now also wants to enter the Frontend World. VueJS is an awesome choice here, it’s fun, it uses native JS and it’s extremely powerful!
Bonus: Student #4
Is disappointed by Angular 2. Does a good Framework need 2 hours of setup? No, certainly not – as VueJS will prove to this Student!
Let’s dive into VueJS right now!
Who this course is for:
This Course is for Everyone interested in Frontend Development and Major JavaScript Frameworks
This Course is for you if you want to create Reactive Applications, which run in the Browser
This Course also targets Students who prefer a native JavaScript Framework which makes Getting Started much simpler than Angular 2
Displeased with Angular 2? VueJS is for you!
Created by Maximilian Schwarzmüller Last updated 11/2018 English English
Size: 4.80 GB
Download Now
https://ift.tt/2eydV0z.
The post Vue JS 2 – The Complete Guide (incl. Vue Router & Vuex) appeared first on Free Course Lab.
0 notes
Text
Introducing Alpine.js: A Tiny JavaScript Framework
About The Author
Phil Smith is a freelance developer based in Brighton, UK. His agency, amillionmonkeys partner with designers, entrepreneurs and agencies to build websites and … More about Phil …
Ever built a website and reached for jQuery, Bootstrap, Vue.js or React to acheive some basic user interaction? Alpine.js is a fraction of the size of these frameworks because it involves no build steps and provides all of the tools you need to build a basic user interface.
Like most developers, I have a bad tendency to over-complicate my workflow, especially if there’s some new hotness on the horizon. Why use CSS when you can use CSS-in-JS? Why use Grunt when you can use Gulp? Why use Gulp when you can use Webpack? Why use a traditional CMS when you can go headless? Every so often though, the new-hotness makes life simpler.
Recently, the rise of utility based tools like Tailwind CSS have done this for CSS, and now Alpine.js promises something similar for JavaScript.
In this article, we’re going to take a closer look at Alpine.js and how it can replace JQuery or larger JavaScript libraries to build interactive websites. If you regularly build sites that require a sprinkling on Javascript to alter the UI based on some user interaction, then this article is for you.
Throughout the article, I refer to Vue.js, but don’t worry if you have no experience of Vue — that is not required. In fact, part of what makes Alpine.js great is that you barely need to know any JavaScript at all.
Now, let’s get started.
What Is Alpine.js?
According to project author Caleb Porzio:
“Alpine.js offers you the reactive and declarative nature of big frameworks like Vue or React at a much lower cost. You get to keep your DOM, and sprinkle in behavior as you see fit.”
Let’s unpack that a bit.
Let’s consider a basic UI pattern like Tabs. Our ultimate goal is that when a user clicks on a tab, the tab contents displays. If we come from a PHP background, we could easily achieve this server side. But the page refresh on every tab click isn’t very ‘reactive’.
To create a better experience over the years, developers have reached for jQuery and/or Bootstrap. In that situation, we create an event listener on the tab, and when a user clicks, the event fires and we tell the browser what to do.
See the Pen Showing / hiding with jQuery by Phil on CodePen.
See the Pen Showing / hiding with jQuery by Phil on CodePen.
That works. But this style of coding where we tell the browser exactly what to do (imperative coding) quickly gets us in a mess. Imagine if we wanted to disable the button after it has been clicked, or wanted to change the background color of the page. We’d quickly get into some serious spaghetti code.
Developers have solved this issue by reaching for frameworks like Vue, Angular and React. These frameworks allow us to write cleaner code by utilizing the virtual DOM: a kind of mirror of the UI stored in the browser memory. The result is that when you ‘hide’ a DOM element (like a tab) in one of these frameworks; it doesn’t add a display:none; style attribute, but instead it literally disappears from the ‘real’ DOM.
This allows us to write more declarative code that is cleaner and easier to read. But this is at a cost. Typically, the bundle size of these frameworks is large and for those coming from a jQuery background, the learning curve feels incredibly steep. Especially when all you want to do is toggle tabs! And that is where Alpine.js steps in.
Like Vue and React, Alpine.js allows us to write declarative code but it uses the “real” DOM; amending the contents and attributes of the same nodes that you and I might edit when we crack open a text editor or dev-tools. As a result, you can lose the filesize, wizardry and cognitive-load of larger framework but retain the declarative programming methodology. And you get this with no bundler, no build process and no script tag. Just load 6kb of Alpine.js and you’re away!
Alpine.js JQuery Vue.js React + React DOM Coding style Declarative Imperative Declarative Declarative Requires bundler No No No Yes Filesize (GZipped, minified) 6.4kb 30kb 32kb 5kb + 36kb Dev-Tools No No Yes Yes
When Should I Reach For Alpine?
For me, Alpine’s strength is in the ease of DOM manipulation. Think of those things you used out of the box with Bootstrap, Alpine.js is great for them. Examples would be:
Showing and hiding DOM nodes under certain conditions,
Binding user input,
Listening for events and altering the UI accordingly,
Appending classes.
You can also use Alpine.js for templating if your data is available in JSON, but let’s save that for another day.
When Should I Look Elsewhere?
If you’re fetching data, or need to carry out additional functions like validation or storing data, you should probably look elsewhere. Larger frameworks also come with dev-tools which can be invaluable when building larger UIs.
From jQuery To Vue To Alpine
Two years ago, Sarah Drasner posted an article on Smashing Magazine, “Replacing jQuery With Vue.js: No Build Step Necessary,” about how Vue could replace jQuery for many projects. That article started me on a journey which led me to use Vue almost every time I build a user interface. Today, we are going to recreate some of her examples with Alpine, which should illustrate its advantages over both jQuery and Vue in certain use cases.
Alpine’s syntax is almost entirely lifted from Vue.js. In total, there are 13 directives. We’ll cover most of them in the following examples.
Getting Started
Like Vue and jQuery, no build process is required. Unlike Vue, Alpine it initializes itself, so there’s no need to create a new instance. Just load Alpine and you’re good to go.
<script src="https://cdn.jsdelivr.net/gh/alpinejs/[email protected]/dist/alpine.js" defer></script>
The scope of any given component is declared using the x-data directive. This kicks things off and sets some default values if required:
<div x-data="{ foo: 'bar' }">...</div>
Capturing User Inputs
x-model allow us to keep any input element in sync with the values set using x-data. In the following example, we set the name value to an empty string (within the form tag). Using x-model, we bind this value to the input field. By using x-text, we inject the value into the innerText of the paragraph element.
See the Pen Capturing user input with Alpine.js by Phil on CodePen.
See the Pen Capturing user input with Alpine.js by Phil on CodePen.
This highlights the key differences with Alpine.js and both jQuery and Vue.js.
Updating the paragraph tag in jQuery would require us to listen for specific events (keyup?), explicitly identify the node we wish to update and the changes we wish to make. Alpine’s syntax on the other hand, just specifies what should happen. This is what is meant by declarative programming.
Updating the paragraph in Vue while simple, would require a new script tag:
new Vue({ el: '#app', data: { name: '' } });
While this might not seem like the end of the world, it highlights the first major gain with Alpine. There is no context-switching. Everything is done right there in the HTML — no need for any additional JavaScript.
Click Events, Boolean Attributes And Toggling Classes
Like with Vue, : serves as a shorthand for x-bind (which binds attributes) and @ is shorthand for x-on (which indicates that Alpine should listen for events).
In the following example, we instantiate a new component using x-data, and set the default value of show to be false. When the button is clicked, we toggle the value of show. When this value is true, we instruct Alpine to append the aria-expanded attribute.
x-bind works differently for classes: we pass in object where the key is the class-name (active in our case) and the value is a boolean expression (show).
See the Pen Click Events, Boolean Attributes and Toggling Classes with Alpine.js by Phil on CodePen.
See the Pen Click Events, Boolean Attributes and Toggling Classes with Alpine.js by Phil on CodePen.
Hiding And Showing
The syntax showing and hiding is almost identical to Vue.
See the Pen Showing / hiding with Alpine.js by Phil on CodePen.
See the Pen Showing / hiding with Alpine.js by Phil on CodePen.
This will set a given DOM node to display:none. If you need to remove a DOM element completely, x-if can be used. However, because Alpine.js doesn’t use the Virtual DOM, x-if can only be used on a <template></template> (tag that wraps the element you wish to hide).
Magic Properties
In addition to the above directives, three Magic Properties provide some additional functionality. All of these will be familiar to anyone working in Vue.js.
$el fetches the root component (the thing with the x-data attribute);
$refs allows you to grab a DOM element;
$nextTick ensures expressions are only executed once Alpine has done its thing;
$event can be used to capture a nature browser event.
See the Pen Magic Properties by Phil on CodePen.
See the Pen Magic Properties by Phil on CodePen.
Let’s Build Something Useful
It’s time to build something for the real world. In the interests of brevity I’m going to use Bootstrap for styles, but use Alpine.js for all the JavaScript. The page we’re building is a simple landing page with a contact form displayed inside a modal that submits to some form handler and displays a nice success message. Just the sort of thing a client might ask for and expect pronto!
Initial view (Large preview)
Modal open (Large preview)
Success message (Large preview)
Note: You can view the original markup here.
To make this work, we could add jQuery and Bootstrap.js, but that is quite a bit of overhead for not a lot of functionality. We could probably write it in Vanilla JS, but who wants to do that? Let’s make it work with Alpine.js instead.
First, let’s set a scope and some initial values:
<body class="text-center text-white bg-dark h-100 d-flex flex-column" x-data="{ showModal: false, name: '', email: '', success: false }">
Now, let’s make our button set the showModal value to true:
<button class="btn btn-lg btn-secondary" @click="showModal = true" >Get in touch</button>
When showModal is true, we need to display the modal and add some classes:
<div class="modal fade text-dark" :class="{ 'show d-block': showModal }" x-show="showModal" role="dialog">
Let’s bind the input values to Alpine:
<input type="text" class="form-control" name="name" x-model="name" > <input type="email" class="form-control" name="email" x-model="email" >
And disable the ‘Submit’ button, until those values are set:
<button type="button" class="btn btn-primary" :disabled="!name || !email">Submit</button>
Finally, let’s send data to some kind of asynchronous function, and hide the modal when we’re done:
<button type="button" class="btn btn-primary" :disabled="!name || !email" @click="submitForm({name: name, email: email}).then(() => {showModal = false; success= true;})">Submit</button>
And that’s about it!
See the Pen Something useful built with Alpine.js by Phil on CodePen.
See the Pen Something useful built with Alpine.js by Phil on CodePen.
Just Enough JavaScript
When building websites, I’m increasingly trying to ask myself what would be “just enough JavaScript”? When building a sophisticated web application, that might well be React. But when building a marketing agency site, or something similar, Alpine.js feels like enough. (And even if it’s not, given the similar syntax, switching to Vue.js takes no time at all).
It’s incredibly easy to use (especially if you’ve never used VueJS). It’s tiny (< 6kb gzipped). And it means no more context switching between HTML and JavaScript files.
There are more advanced features that aren’t included in this article and Caleb is constantly adding new features. If you want to find out more, take a look at the official docs on Github.
(ra, il)
Website Design & SEO Delray Beach by DBL07.co
Delray Beach SEO
source http://www.scpie.org/introducing-alpine-js-a-tiny-javascript-framework/ source https://scpie.tumblr.com/post/611788754623086592
0 notes
Text
Introducing Alpine.js: A Tiny JavaScript Framework
About The Author
Phil Smith is a freelance developer based in Brighton, UK. His agency, amillionmonkeys partner with designers, entrepreneurs and agencies to build websites and … More about Phil …
Ever built a website and reached for jQuery, Bootstrap, Vue.js or React to acheive some basic user interaction? Alpine.js is a fraction of the size of these frameworks because it involves no build steps and provides all of the tools you need to build a basic user interface.
Like most developers, I have a bad tendency to over-complicate my workflow, especially if there’s some new hotness on the horizon. Why use CSS when you can use CSS-in-JS? Why use Grunt when you can use Gulp? Why use Gulp when you can use Webpack? Why use a traditional CMS when you can go headless? Every so often though, the new-hotness makes life simpler.
Recently, the rise of utility based tools like Tailwind CSS have done this for CSS, and now Alpine.js promises something similar for JavaScript.
In this article, we’re going to take a closer look at Alpine.js and how it can replace JQuery or larger JavaScript libraries to build interactive websites. If you regularly build sites that require a sprinkling on Javascript to alter the UI based on some user interaction, then this article is for you.
Throughout the article, I refer to Vue.js, but don’t worry if you have no experience of Vue — that is not required. In fact, part of what makes Alpine.js great is that you barely need to know any JavaScript at all.
Now, let’s get started.
What Is Alpine.js?
According to project author Caleb Porzio:
“Alpine.js offers you the reactive and declarative nature of big frameworks like Vue or React at a much lower cost. You get to keep your DOM, and sprinkle in behavior as you see fit.”
Let’s unpack that a bit.
Let’s consider a basic UI pattern like Tabs. Our ultimate goal is that when a user clicks on a tab, the tab contents displays. If we come from a PHP background, we could easily achieve this server side. But the page refresh on every tab click isn’t very ‘reactive’.
To create a better experience over the years, developers have reached for jQuery and/or Bootstrap. In that situation, we create an event listener on the tab, and when a user clicks, the event fires and we tell the browser what to do.
See the Pen Showing / hiding with jQuery by Phil on CodePen.
See the Pen Showing / hiding with jQuery by Phil on CodePen.
That works. But this style of coding where we tell the browser exactly what to do (imperative coding) quickly gets us in a mess. Imagine if we wanted to disable the button after it has been clicked, or wanted to change the background color of the page. We’d quickly get into some serious spaghetti code.
Developers have solved this issue by reaching for frameworks like Vue, Angular and React. These frameworks allow us to write cleaner code by utilizing the virtual DOM: a kind of mirror of the UI stored in the browser memory. The result is that when you ‘hide’ a DOM element (like a tab) in one of these frameworks; it doesn’t add a display:none; style attribute, but instead it literally disappears from the ‘real’ DOM.
This allows us to write more declarative code that is cleaner and easier to read. But this is at a cost. Typically, the bundle size of these frameworks is large and for those coming from a jQuery background, the learning curve feels incredibly steep. Especially when all you want to do is toggle tabs! And that is where Alpine.js steps in.
Like Vue and React, Alpine.js allows us to write declarative code but it uses the “real” DOM; amending the contents and attributes of the same nodes that you and I might edit when we crack open a text editor or dev-tools. As a result, you can lose the filesize, wizardry and cognitive-load of larger framework but retain the declarative programming methodology. And you get this with no bundler, no build process and no script tag. Just load 6kb of Alpine.js and you’re away!
Alpine.jsJQueryVue.jsReact + React DOMCoding styleDeclarativeImperativeDeclarativeDeclarativeRequires bundlerNoNoNoYesFilesize (GZipped, minified)6.4kb30kb32kb5kb + 36kbDev-ToolsNoNoYesYes
When Should I Reach For Alpine?
For me, Alpine’s strength is in the ease of DOM manipulation. Think of those things you used out of the box with Bootstrap, Alpine.js is great for them. Examples would be:
Showing and hiding DOM nodes under certain conditions,
Binding user input,
Listening for events and altering the UI accordingly,
Appending classes.
You can also use Alpine.js for templating if your data is available in JSON, but let’s save that for another day.
When Should I Look Elsewhere?
If you’re fetching data, or need to carry out additional functions like validation or storing data, you should probably look elsewhere. Larger frameworks also come with dev-tools which can be invaluable when building larger UIs.
From jQuery To Vue To Alpine
Two years ago, Sarah Drasner posted an article on Smashing Magazine, “Replacing jQuery With Vue.js: No Build Step Necessary,” about how Vue could replace jQuery for many projects. That article started me on a journey which led me to use Vue almost every time I build a user interface. Today, we are going to recreate some of her examples with Alpine, which should illustrate its advantages over both jQuery and Vue in certain use cases.
Alpine’s syntax is almost entirely lifted from Vue.js. In total, there are 13 directives. We’ll cover most of them in the following examples.
Getting Started
Like Vue and jQuery, no build process is required. Unlike Vue, Alpine it initializes itself, so there’s no need to create a new instance. Just load Alpine and you’re good to go.
<script src="https://cdn.jsdelivr.net/gh/alpinejs/[email protected]/dist/alpine.js" defer></script>
The scope of any given component is declared using the x-data directive. This kicks things off and sets some default values if required:
<div x-data="{ foo: 'bar' }">...</div>
Capturing User Inputs
x-model allow us to keep any input element in sync with the values set using x-data. In the following example, we set the name value to an empty string (within the form tag). Using x-model, we bind this value to the input field. By using x-text, we inject the value into the innerText of the paragraph element.
See the Pen Capturing user input with Alpine.js by Phil on CodePen.
See the Pen Capturing user input with Alpine.js by Phil on CodePen.
This highlights the key differences with Alpine.js and both jQuery and Vue.js.
Updating the paragraph tag in jQuery would require us to listen for specific events (keyup?), explicitly identify the node we wish to update and the changes we wish to make. Alpine’s syntax on the other hand, just specifies what should happen. This is what is meant by declarative programming.
Updating the paragraph in Vue while simple, would require a new script tag:
new Vue({ el: '#app', data: { name: '' } });
While this might not seem like the end of the world, it highlights the first major gain with Alpine. There is no context-switching. Everything is done right there in the HTML — no need for any additional JavaScript.
Click Events, Boolean Attributes And Toggling Classes
Like with Vue, : serves as a shorthand for x-bind (which binds attributes) and @ is shorthand for x-on (which indicates that Alpine should listen for events).
In the following example, we instantiate a new component using x-data, and set the default value of show to be false. When the button is clicked, we toggle the value of show. When this value is true, we instruct Alpine to append the aria-expanded attribute.
x-bind works differently for classes: we pass in object where the key is the class-name (active in our case) and the value is a boolean expression (show).
See the Pen Click Events, Boolean Attributes and Toggling Classes with Alpine.js by Phil on CodePen.
See the Pen Click Events, Boolean Attributes and Toggling Classes with Alpine.js by Phil on CodePen.
Hiding And Showing
The syntax showing and hiding is almost identical to Vue.
See the Pen Showing / hiding with Alpine.js by Phil on CodePen.
See the Pen Showing / hiding with Alpine.js by Phil on CodePen.
This will set a given DOM node to display:none. If you need to remove a DOM element completely, x-if can be used. However, because Alpine.js doesn’t use the Virtual DOM, x-if can only be used on a <template></template> (tag that wraps the element you wish to hide).
Magic Properties
In addition to the above directives, three Magic Properties provide some additional functionality. All of these will be familiar to anyone working in Vue.js.
$el fetches the root component (the thing with the x-data attribute);
$refs allows you to grab a DOM element;
$nextTick ensures expressions are only executed once Alpine has done its thing;
$event can be used to capture a nature browser event.
See the Pen Magic Properties by Phil on CodePen.
See the Pen Magic Properties by Phil on CodePen.
Let’s Build Something Useful
It’s time to build something for the real world. In the interests of brevity I’m going to use Bootstrap for styles, but use Alpine.js for all the JavaScript. The page we’re building is a simple landing page with a contact form displayed inside a modal that submits to some form handler and displays a nice success message. Just the sort of thing a client might ask for and expect pronto!
Initial view (Large preview)
Modal open (Large preview)
Success message (Large preview)
Note: You can view the original markup here.
To make this work, we could add jQuery and Bootstrap.js, but that is quite a bit of overhead for not a lot of functionality. We could probably write it in Vanilla JS, but who wants to do that? Let’s make it work with Alpine.js instead.
First, let’s set a scope and some initial values:
<body class="text-center text-white bg-dark h-100 d-flex flex-column" x-data="{ showModal: false, name: '', email: '', success: false }">
Now, let’s make our button set the showModal value to true:
<button class="btn btn-lg btn-secondary" @click="showModal = true" >Get in touch</button>
When showModal is true, we need to display the modal and add some classes:
<div class="modal fade text-dark" :class="{ 'show d-block': showModal }" x-show="showModal" role="dialog">
Let’s bind the input values to Alpine:
<input type="text" class="form-control" name="name" x-model="name" > <input type="email" class="form-control" name="email" x-model="email" >
And disable the ‘Submit’ button, until those values are set:
<button type="button" class="btn btn-primary" :disabled="!name || !email">Submit</button>
Finally, let’s send data to some kind of asynchronous function, and hide the modal when we’re done:
<button type="button" class="btn btn-primary" :disabled="!name || !email" @click="submitForm({name: name, email: email}).then(() => {showModal = false; success= true;})">Submit</button>
And that’s about it!
See the Pen Something useful built with Alpine.js by Phil on CodePen.
See the Pen Something useful built with Alpine.js by Phil on CodePen.
Just Enough JavaScript
When building websites, I’m increasingly trying to ask myself what would be “just enough JavaScript”? When building a sophisticated web application, that might well be React. But when building a marketing agency site, or something similar, Alpine.js feels like enough. (And even if it’s not, given the similar syntax, switching to Vue.js takes no time at all).
It’s incredibly easy to use (especially if you’ve never used VueJS). It’s tiny (< 6kb gzipped). And it means no more context switching between HTML and JavaScript files.
There are more advanced features that aren’t included in this article and Caleb is constantly adding new features. If you want to find out more, take a look at the official docs on Github.
(ra, il)
Website Design & SEO Delray Beach by DBL07.co
Delray Beach SEO
source http://www.scpie.org/introducing-alpine-js-a-tiny-javascript-framework/ source https://scpie1.blogspot.com/2020/03/introducing-alpinejs-tiny-javascript.html
0 notes
Text
Harness the power of Angular and Ionic for Building World-class Apps!

Angular development has become one of the best approaches for designing highly intuitive applications and when clubbed with a finely-tuned Ionic framework, the combination becomes all the more powerful and leads to the creation of beautifully designed user-centric hybrid mobile apps. This combination has already being used for countless projects worldwide. Consequently, Ionic and Angular JS app development services are highly being preferred by diverse industrial domains for various applications.
So please read the following post to know more about these vibrant technologies and the benefits that their combination offers.
What is Angular?
Angular is an open-source framework maintained by Google. It is a client-side development framework and was developed by Misko Hevery, an engineer at Brat Tech LLC in 2009. The Angular framework was launched in 2012; the first version being AngularJS. This framework comes with a host of tools and libraries that enable the Angular app developers to easily create robust feature-rich apps for diverse client needs. Additionally, it helps in developing and testing the virtual platforms; and as a result, can be utilized for Enterprise apps. Some of the top features of this framework are:
Two-way data binding
Filters
Model View Controller (MVC)
Templates
Licensed under the Apache license version 2.0
Directives
Dependency Injection
What is Ionic?
Ionic is an open-source software development kit (SDK) that ensures faster and cost-effective app development of mobile apps, desktop apps, PWAs, etc. with the utilization of technologies like HTML5, CSS, SASS, etc. It was created on top of AngularJS in the year 2013 by Max Lynch, Adam Bradley, and Ben Sperry of Drifty Co. Thereafter, it has added the support for React and Angular; the support for Vue is still under development.
Ionic app development mainly focuses on the front-end. It is an innovative SDK that enables the development of top-grade personal and commercial apps. The development of Ionic apps is easier since the Ionic framework is simpler to learn and implement. Moreover, the Ionic App Developers enjoy working with this framework. The key features of Ionic’s are given below:
Platform Independence
Intuitive User Interface
Cordova Plugins
High Adaptability
CSS and JavaScript Components
Ionic CLI
Ionic View
MIT License
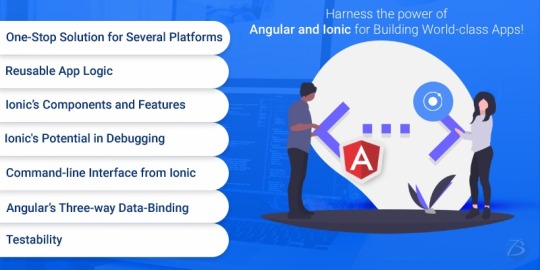
Combined Benefits of Both Technologies- Angular and Ionic
One-Stop Solution for Several Platforms:
Earlier, the developers needed to create separate codes for Android, Windows, iOS, etc. But AngularJS and Ionic changed this scenario allowing the development of multiple apps with a single codebase. Such apps can be easily downloaded from the app stores and can be run on any platform or device.
Reusable App Logic:
Fusing AngularJS and Ionic enables the developers to separate user interfaces, system logic, and data models. This means that the developers in parallel can reuse the logic and also customize the UI for different gadgets and different platforms like iOS, Android, Windows, etc. This reusability of the app logic has made the process less time-consuming and less expensive.
Ionic’s Components and Features:
Creating innovative icons and splash screens is a challenging task, especially for hybrid app development. For developing splash screens, the developers have to consider several parameters like length, density, width, type of device, etc. Ionic is a native-style UI kit that comes with various amazing features and components for making the development process hassle-free. Ionic’s .png, .ai, or .psd extensions help in building two files that enable smooth development of icons, splash screens, etc., and aesthetically appealing designs.
Angular’s Three-way Data-Binding:
Angular allows three-way data binding which means it enables simultaneous updating of the data model, UI as well as backend data in a hassle-free manner. So, when the in-memory data and UI are in sync with backend service data, the chances of user data staying complete across the devices are much higher. This also means that in Angular, it is easy to take the users’ inputs, process the information, save it on the server, and hence keeping the user interface synched with the backend is much easier.
Testability:
Testing is the most essential process once the apps are developed. It is a complicated and time-intensive process. But AngularJS eases out the testing process to a certain extent due to the Dependency Injection (DI) feature. This feature lets the developers fetch the pieces of the code from anywhere and duplicates the code for testing purposes. This means that the real components are replaced for the ones that fake the functionality.
Additional Benefits of Ionic App Development:
Ionic plays a significant role in app development due to its potential in debugging, performance-boosting qualities, and the ability to create attractive UI. The Ionic developers can take advantage of $ionicConfigProvider elaborate transition, style, or behavioral pattern. It creates the elements as per the device’s layout and also abides by the guidelines while utilizing the elements on diverse devices. Also, Ionic apps are built in a modular fashion, hence it is easy to update and maintain the app.
Another noteworthy feature of the Ionic is the Command-line interface i.e. CLI. It enables the development, implementation, and testing of any application on multiple platforms using a single command. This improves productivity and saves time for developers.
Conclusion: Combined Effect of AngularJS and Ionic
AngularJS framework is known for delivering robust performance and captivating front-end for the apps. On top of that, when it is clubbed with Ionic, it unlocks new possibilities for developing captivating apps. Ionic has attractive themes and the availability of several components that help in the creation of an outstanding UI. This ultimately elevates the user experience and also retains the end-users. Moreover, both frameworks make the development process quite easier and faster for developers and cost-effective for businesses. So, if you want to build apps using Ionic and AngularJS, connect with an Ionic app development company or an Angular app development company and share the ideas with them to build a cutting-edge app.
To know more about our other core technologies, refer to links below:
Ruby on rails
Node JS
Blockchain
0 notes
Text
Introducing Alpine.js: A Tiny JavaScript Framework
About The Author
Phil Smith is a freelance developer based in Brighton, UK. His agency, amillionmonkeys partner with designers, entrepreneurs and agencies to build websites and … More about Phil …
Ever built a website and reached for jQuery, Bootstrap, Vue.js or React to acheive some basic user interaction? Alpine.js is a fraction of the size of these frameworks because it involves no build steps and provides all of the tools you need to build a basic user interface.
Like most developers, I have a bad tendency to over-complicate my workflow, especially if there’s some new hotness on the horizon. Why use CSS when you can use CSS-in-JS? Why use Grunt when you can use Gulp? Why use Gulp when you can use Webpack? Why use a traditional CMS when you can go headless? Every so often though, the new-hotness makes life simpler.
Recently, the rise of utility based tools like Tailwind CSS have done this for CSS, and now Alpine.js promises something similar for JavaScript.
In this article, we’re going to take a closer look at Alpine.js and how it can replace JQuery or larger JavaScript libraries to build interactive websites. If you regularly build sites that require a sprinkling on Javascript to alter the UI based on some user interaction, then this article is for you.
Throughout the article, I refer to Vue.js, but don’t worry if you have no experience of Vue — that is not required. In fact, part of what makes Alpine.js great is that you barely need to know any JavaScript at all.
Now, let’s get started.
What Is Alpine.js?
According to project author Caleb Porzio:
“Alpine.js offers you the reactive and declarative nature of big frameworks like Vue or React at a much lower cost. You get to keep your DOM, and sprinkle in behavior as you see fit.”
Let’s unpack that a bit.
Let’s consider a basic UI pattern like Tabs. Our ultimate goal is that when a user clicks on a tab, the tab contents displays. If we come from a PHP background, we could easily achieve this server side. But the page refresh on every tab click isn’t very ‘reactive’.
To create a better experience over the years, developers have reached for jQuery and/or Bootstrap. In that situation, we create an event listener on the tab, and when a user clicks, the event fires and we tell the browser what to do.
See the Pen Showing / hiding with jQuery by Phil on CodePen.
See the Pen Showing / hiding with jQuery by Phil on CodePen.
That works. But this style of coding where we tell the browser exactly what to do (imperative coding) quickly gets us in a mess. Imagine if we wanted to disable the button after it has been clicked, or wanted to change the background color of the page. We’d quickly get into some serious spaghetti code.
Developers have solved this issue by reaching for frameworks like Vue, Angular and React. These frameworks allow us to write cleaner code by utilizing the virtual DOM: a kind of mirror of the UI stored in the browser memory. The result is that when you ‘hide’ a DOM element (like a tab) in one of these frameworks; it doesn’t add a display:none; style attribute, but instead it literally disappears from the ‘real’ DOM.
This allows us to write more declarative code that is cleaner and easier to read. But this is at a cost. Typically, the bundle size of these frameworks is large and for those coming from a jQuery background, the learning curve feels incredibly steep. Especially when all you want to do is toggle tabs! And that is where Alpine.js steps in.
Like Vue and React, Alpine.js allows us to write declarative code but it uses the “real” DOM; amending the contents and attributes of the same nodes that you and I might edit when we crack open a text editor or dev-tools. As a result, you can lose the filesize, wizardry and cognitive-load of larger framework but retain the declarative programming methodology. And you get this with no bundler, no build process and no script tag. Just load 6kb of Alpine.js and you’re away!
Alpine.js JQuery Vue.js React + React DOM Coding style Declarative Imperative Declarative Declarative Requires bundler No No No Yes Filesize (GZipped, minified) 6.4kb 30kb 32kb 5kb + 36kb Dev-Tools No No Yes Yes
When Should I Reach For Alpine?
For me, Alpine’s strength is in the ease of DOM manipulation. Think of those things you used out of the box with Bootstrap, Alpine.js is great for them. Examples would be:
Showing and hiding DOM nodes under certain conditions,
Binding user input,
Listening for events and altering the UI accordingly,
Appending classes.
You can also use Alpine.js for templating if your data is available in JSON, but let’s save that for another day.
When Should I Look Elsewhere?
If you’re fetching data, or need to carry out additional functions like validation or storing data, you should probably look elsewhere. Larger frameworks also come with dev-tools which can be invaluable when building larger UIs.
From jQuery To Vue To Alpine
Two years ago, Sarah Drasner posted an article on Smashing Magazine, “Replacing jQuery With Vue.js: No Build Step Necessary,” about how Vue could replace jQuery for many projects. That article started me on a journey which led me to use Vue almost every time I build a user interface. Today, we are going to recreate some of her examples with Alpine, which should illustrate its advantages over both jQuery and Vue in certain use cases.
Alpine’s syntax is almost entirely lifted from Vue.js. In total, there are 13 directives. We’ll cover most of them in the following examples.
Getting Started
Like Vue and jQuery, no build process is required. Unlike Vue, Alpine it initializes itself, so there’s no need to create a new instance. Just load Alpine and you’re good to go.
<script src="https://cdn.jsdelivr.net/gh/alpinejs/[email protected]/dist/alpine.js" defer></script>
The scope of any given component is declared using the x-data directive. This kicks things off and sets some default values if required:
<div x-data="{ foo: 'bar' }">...</div>
Capturing User Inputs
x-model allow us to keep any input element in sync with the values set using x-data. In the following example, we set the name value to an empty string (within the form tag). Using x-model, we bind this value to the input field. By using x-text, we inject the value into the innerText of the paragraph element.
See the Pen Capturing user input with Alpine.js by Phil on CodePen.
See the Pen Capturing user input with Alpine.js by Phil on CodePen.
This highlights the key differences with Alpine.js and both jQuery and Vue.js.
Updating the paragraph tag in jQuery would require us to listen for specific events (keyup?), explicitly identify the node we wish to update and the changes we wish to make. Alpine’s syntax on the other hand, just specifies what should happen. This is what is meant by declarative programming.
Updating the paragraph in Vue while simple, would require a new script tag:
new Vue({ el: '#app', data: { name: '' } });
While this might not seem like the end of the world, it highlights the first major gain with Alpine. There is no context-switching. Everything is done right there in the HTML — no need for any additional JavaScript.
Click Events, Boolean Attributes And Toggling Classes
Like with Vue, : serves as a shorthand for x-bind (which binds attributes) and @ is shorthand for x-on (which indicates that Alpine should listen for events).
In the following example, we instantiate a new component using x-data, and set the default value of show to be false. When the button is clicked, we toggle the value of show. When this value is true, we instruct Alpine to append the aria-expanded attribute.
x-bind works differently for classes: we pass in object where the key is the class-name (active in our case) and the value is a boolean expression (show).
See the Pen Click Events, Boolean Attributes and Toggling Classes with Alpine.js by Phil on CodePen.
See the Pen Click Events, Boolean Attributes and Toggling Classes with Alpine.js by Phil on CodePen.
Hiding And Showing
The syntax showing and hiding is almost identical to Vue.
See the Pen Showing / hiding with Alpine.js by Phil on CodePen.
See the Pen Showing / hiding with Alpine.js by Phil on CodePen.
This will set a given DOM node to display:none. If you need to remove a DOM element completely, x-if can be used. However, because Alpine.js doesn’t use the Virtual DOM, x-if can only be used on a <template></template> (tag that wraps the element you wish to hide).
Magic Properties
In addition to the above directives, three Magic Properties provide some additional functionality. All of these will be familiar to anyone working in Vue.js.
$el fetches the root component (the thing with the x-data attribute);
$refs allows you to grab a DOM element;
$nextTick ensures expressions are only executed once Alpine has done its thing;
$event can be used to capture a nature browser event.
See the Pen Magic Properties by Phil on CodePen.
See the Pen Magic Properties by Phil on CodePen.
Let’s Build Something Useful
It’s time to build something for the real world. In the interests of brevity I’m going to use Bootstrap for styles, but use Alpine.js for all the JavaScript. The page we’re building is a simple landing page with a contact form displayed inside a modal that submits to some form handler and displays a nice success message. Just the sort of thing a client might ask for and expect pronto!
Initial view (Large preview)
Modal open (Large preview)
Success message (Large preview)
Note: You can view the original markup here.
To make this work, we could add jQuery and Bootstrap.js, but that is quite a bit of overhead for not a lot of functionality. We could probably write it in Vanilla JS, but who wants to do that? Let’s make it work with Alpine.js instead.
First, let’s set a scope and some initial values:
<body class="text-center text-white bg-dark h-100 d-flex flex-column" x-data="{ showModal: false, name: '', email: '', success: false }">
Now, let’s make our button set the showModal value to true:
<button class="btn btn-lg btn-secondary" @click="showModal = true" >Get in touch</button>
When showModal is true, we need to display the modal and add some classes:
<div class="modal fade text-dark" :class="{ 'show d-block': showModal }" x-show="showModal" role="dialog">
Let’s bind the input values to Alpine:
<input type="text" class="form-control" name="name" x-model="name" > <input type="email" class="form-control" name="email" x-model="email" >
And disable the ‘Submit’ button, until those values are set:
<button type="button" class="btn btn-primary" :disabled="!name || !email">Submit</button>
Finally, let’s send data to some kind of asynchronous function, and hide the modal when we’re done:
<button type="button" class="btn btn-primary" :disabled="!name || !email" @click="submitForm({name: name, email: email}).then(() => {showModal = false; success= true;})">Submit</button>
And that’s about it!
See the Pen Something useful built with Alpine.js by Phil on CodePen.
See the Pen Something useful built with Alpine.js by Phil on CodePen.
Just Enough JavaScript
When building websites, I’m increasingly trying to ask myself what would be “just enough JavaScript”? When building a sophisticated web application, that might well be React. But when building a marketing agency site, or something similar, Alpine.js feels like enough. (And even if it’s not, given the similar syntax, switching to Vue.js takes no time at all).
It’s incredibly easy to use (especially if you’ve never used VueJS). It’s tiny (< 6kb gzipped). And it means no more context switching between HTML and JavaScript files.
There are more advanced features that aren’t included in this article and Caleb is constantly adding new features. If you want to find out more, take a look at the official docs on Github.
(ra, il)
Website Design & SEO Delray Beach by DBL07.co
Delray Beach SEO
source http://www.scpie.org/introducing-alpine-js-a-tiny-javascript-framework/
0 notes